

How to install Ipposnif on a Microsoft Azure Virtual Machine
May 21, 2019 14:13:44 GMT
luizgabriel likes this
Post by Ipposnif on May 21, 2019 14:13:44 GMT
I will explain, step by step, how to create an Azure VPS (Virtual Private Server) where to install Ipposnif. The chosen virtual machine is the B2s that has 2 CPU core with 4 GB of RAM, and a cost of approximately 40 euro month.
There are pros and cons to using a VM for Ipposnif:
Pros
You have a machine uptime close to 99.9%.
You have a network (internet) uptime close to 99.9%.
You don't have to care about hardware maintenance.
You can connect to the VM wherever you are, without using third-party programs.
You can monitor the program and the VM with fancy charts.
Cons
It is relatively expensive. However, consider that you will save the money for a desktop computer running 24H, that has cost in electricity of approximately 10 euro month.
It is slower than a normal desktop computer. You can use a VM only for automatic strategies that don't require extreme speed.
Step 1 - Register to Azure
Open portal.azure.com and register/login to Azure.
Step 2 - Create the virtual machine
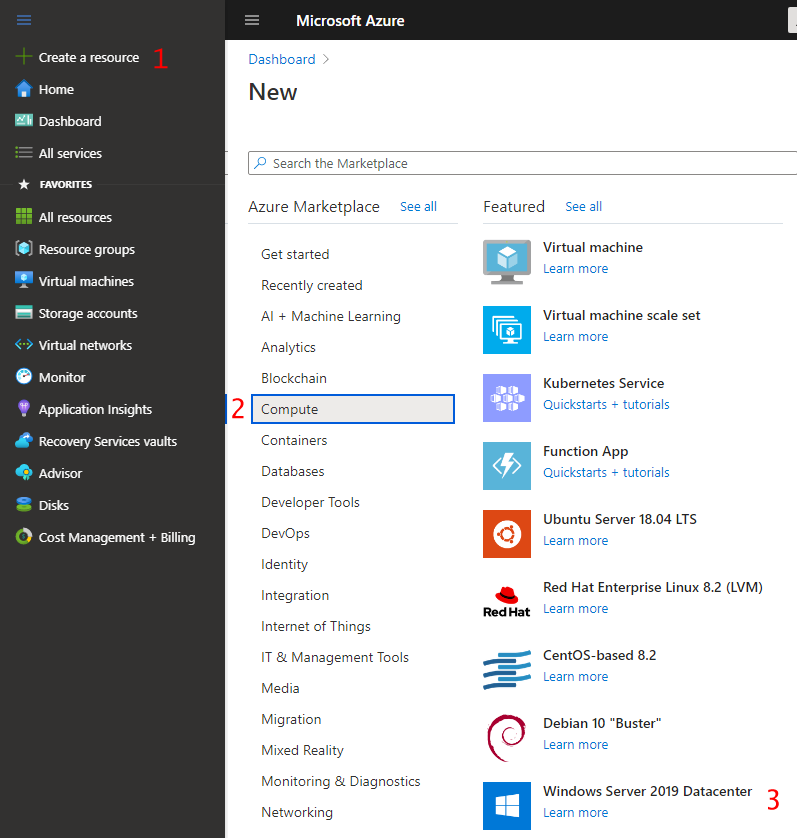
1. Click + on the left toolbar
2. Click "Compute"
3. Click "Windows Server 2019 Datacenter"
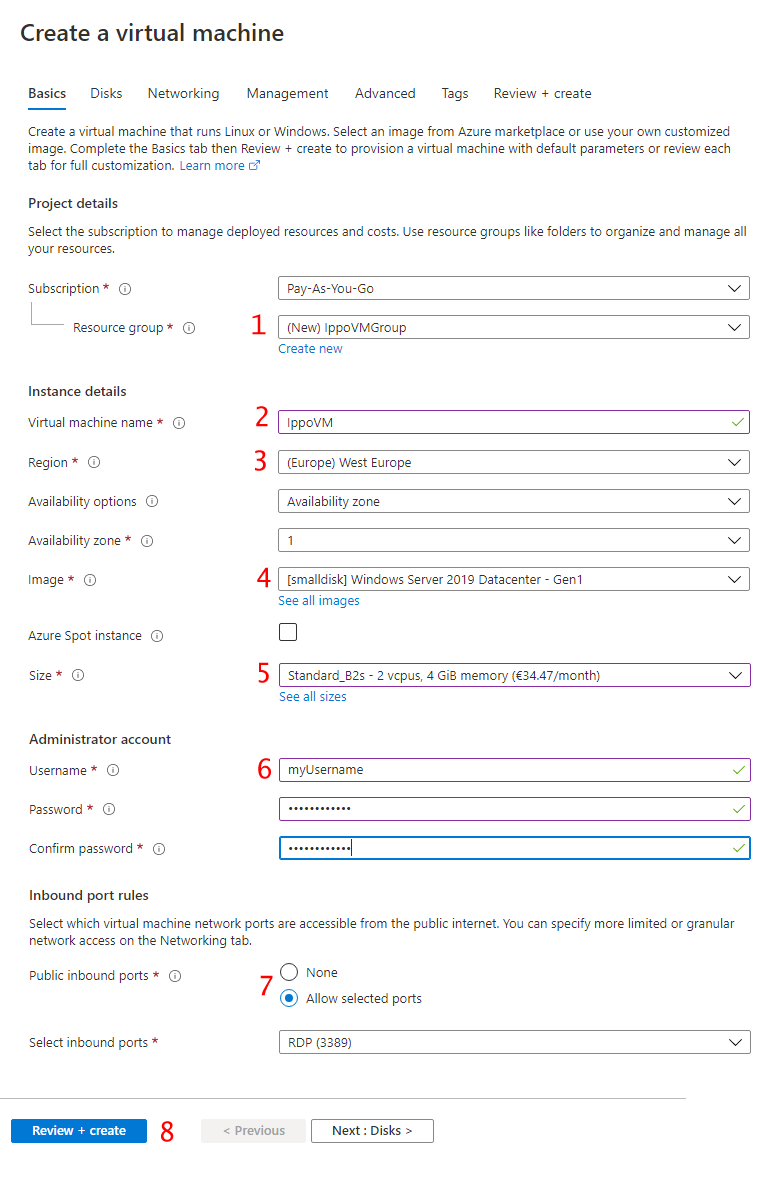
1. Create a new group of resources. this is the container for the VM and the other needed resources.
2. Insert a name for the new VM
3. Choose the location of the server farm. it must be in a country where betting on Betfair is allowed. It should be close to the Betfair API servers and to your location. If you don't know which one to pick up, choose "UK South".
4. Choose [smalldisk] Windows Server 2019. If you will use this VM only for Ipposnif, the 32GB disk space is more than enough.
5. Choose the B2s as size. This size is enough to run Ipposnif in standard mode with a dozen of active strategies.
6. Choose the username and password of the VM. Don't forget them, because there is no way to recover them.
7. Allow port 3389 for incoming connections. This port is used by Microsoft Remote Desktop, the program used to connect to the VM desktop.
8. Click the button "Review + create", confirm the review and wait until the VM will be ready (4-10 minutes)
Step 3 - Install Ipposnif on the VM
1. Search for the program "Remote Desktop Connection" on your PC and run it.
2. Insert the IP of the VM you have just created and connect to it. You can get the IP from the properties of the VM in the Azure portal.
3. Insert the username and password of the VM and log-in.
4. Press [Windows key]+R and run the command "sconfig". Press 5 (Windows Update Settings) and choose the "manual" option. This will prevent the VM from restarting automatically when it gets new updates from Microsoft.
5. Copy the setup of Ipposnif to the desktop of the VM and install it.
Notes:
a) Ipposnif is not a Windows service but a normal program, so to keep it running you cannot log-off the VM user. Instead, you can simply close the remote desktop connection window.
b) To speed up the operations of creating the VM and installing Ipposnif on it, you could start with a faster VM (for example the D2s_v3 140€ month). Then, after the installation, you can switch the size of the VM to B2S from the VM properties in the Azure Portal. You pay a virtual machine only for the time you are using it, so you will pay the 140€ month machine only for the few minutes of the installation.
c) If you reserve the VM for 1-3 years you can save up to 60% of the total cost. Adopting Microsoft Reservation doesn't change your billing period, which can be kept on a monthly basis.
There are pros and cons to using a VM for Ipposnif:
Pros
You have a machine uptime close to 99.9%.
You have a network (internet) uptime close to 99.9%.
You don't have to care about hardware maintenance.
You can connect to the VM wherever you are, without using third-party programs.
You can monitor the program and the VM with fancy charts.
Cons
It is relatively expensive. However, consider that you will save the money for a desktop computer running 24H, that has cost in electricity of approximately 10 euro month.
It is slower than a normal desktop computer. You can use a VM only for automatic strategies that don't require extreme speed.
Step 1 - Register to Azure
Open portal.azure.com and register/login to Azure.
Step 2 - Create the virtual machine
1. Click + on the left toolbar
2. Click "Compute"
3. Click "Windows Server 2019 Datacenter"
1. Create a new group of resources. this is the container for the VM and the other needed resources.
2. Insert a name for the new VM
3. Choose the location of the server farm. it must be in a country where betting on Betfair is allowed. It should be close to the Betfair API servers and to your location. If you don't know which one to pick up, choose "UK South".
4. Choose [smalldisk] Windows Server 2019. If you will use this VM only for Ipposnif, the 32GB disk space is more than enough.
5. Choose the B2s as size. This size is enough to run Ipposnif in standard mode with a dozen of active strategies.
6. Choose the username and password of the VM. Don't forget them, because there is no way to recover them.
7. Allow port 3389 for incoming connections. This port is used by Microsoft Remote Desktop, the program used to connect to the VM desktop.
8. Click the button "Review + create", confirm the review and wait until the VM will be ready (4-10 minutes)
Step 3 - Install Ipposnif on the VM
1. Search for the program "Remote Desktop Connection" on your PC and run it.
2. Insert the IP of the VM you have just created and connect to it. You can get the IP from the properties of the VM in the Azure portal.
3. Insert the username and password of the VM and log-in.
4. Press [Windows key]+R and run the command "sconfig". Press 5 (Windows Update Settings) and choose the "manual" option. This will prevent the VM from restarting automatically when it gets new updates from Microsoft.
5. Copy the setup of Ipposnif to the desktop of the VM and install it.
Notes:
a) Ipposnif is not a Windows service but a normal program, so to keep it running you cannot log-off the VM user. Instead, you can simply close the remote desktop connection window.
b) To speed up the operations of creating the VM and installing Ipposnif on it, you could start with a faster VM (for example the D2s_v3 140€ month). Then, after the installation, you can switch the size of the VM to B2S from the VM properties in the Azure Portal. You pay a virtual machine only for the time you are using it, so you will pay the 140€ month machine only for the few minutes of the installation.
c) If you reserve the VM for 1-3 years you can save up to 60% of the total cost. Adopting Microsoft Reservation doesn't change your billing period, which can be kept on a monthly basis.


